Installation Guide
This page describes how to install and configure the BookmarkSync extension.
System Requirements
- Chrome browser (version 111 and above)
- Or other Chromium-based browsers (Edge, Brave, Opera, etc.)
Download Extension
Method 1: Chrome Web Store (Recommended)
- Chrome Web Store download: Download link
- Edge Web Store download: Download link
- Auto-install after downloading from store
Method 2: Manual Download and Installation
- Direct download: Download link
- Manual installation required after download (see installation steps below)
Installation Steps
Install from Web Store
- Visit the BookmarkSync page on Chrome Web Store
- Click the "Add to Chrome" button
- Click "Add extension" in the confirmation dialog
- After installation, the BookmarkSync icon will appear in browser toolbar
Manual Installation (Developer Mode)
If you downloaded the extension file from outside the web store, follow these steps for manual installation:
- Open Chrome browser
- Click the menu button in upper right corner

- Select [Extensions] → [Manage Extensions]
- Or directly enter
chrome://extensions/in the address bar and press Enter - Turn on the "Developer mode" switch in the upper right corner
- Drag the downloaded
.crxfile or extracted folder into the browser window - Confirm the installation prompt to complete installation
Registration and Login
Why Login is Required
BookmarkSync requires login to use cloud sync features:
- Backup browser bookmarks to the cloud
- Automatic bookmark sync across multiple devices
- Use cloud bookmarks and private bookmarks features
Register Account
Currently supports two registration methods:
Method 1: Email Registration
- Open the extension (click the extension icon in toolbar)
- Click the "Login" button in the upper right corner
- Select "Register" on the login page
- Enter email address and password
- Verify email (check verification email)
- Complete registration
Method 2: GitHub Account Login
- Open the extension
- Click the "Login" button in the upper right corner
- Select "Login with GitHub"
- Authorize BookmarkSync to access your GitHub account
- System will automatically create an account using the email bound to GitHub
- Complete login
Login Steps
1. Pin Extension Icon (Optional but Recommended)
For easy access, it's recommended to pin the extension to the toolbar:
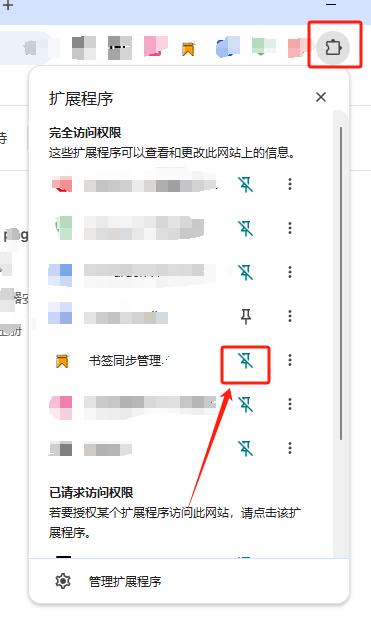
- Click the puzzle icon (extension management) in the browser toolbar
- Find BookmarkSync
- Click the pin icon to pin it
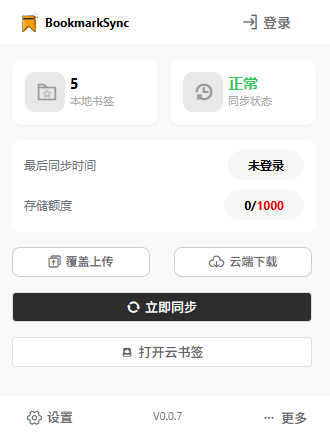
2. Open Extension
Click the BookmarkSync icon in the toolbar:
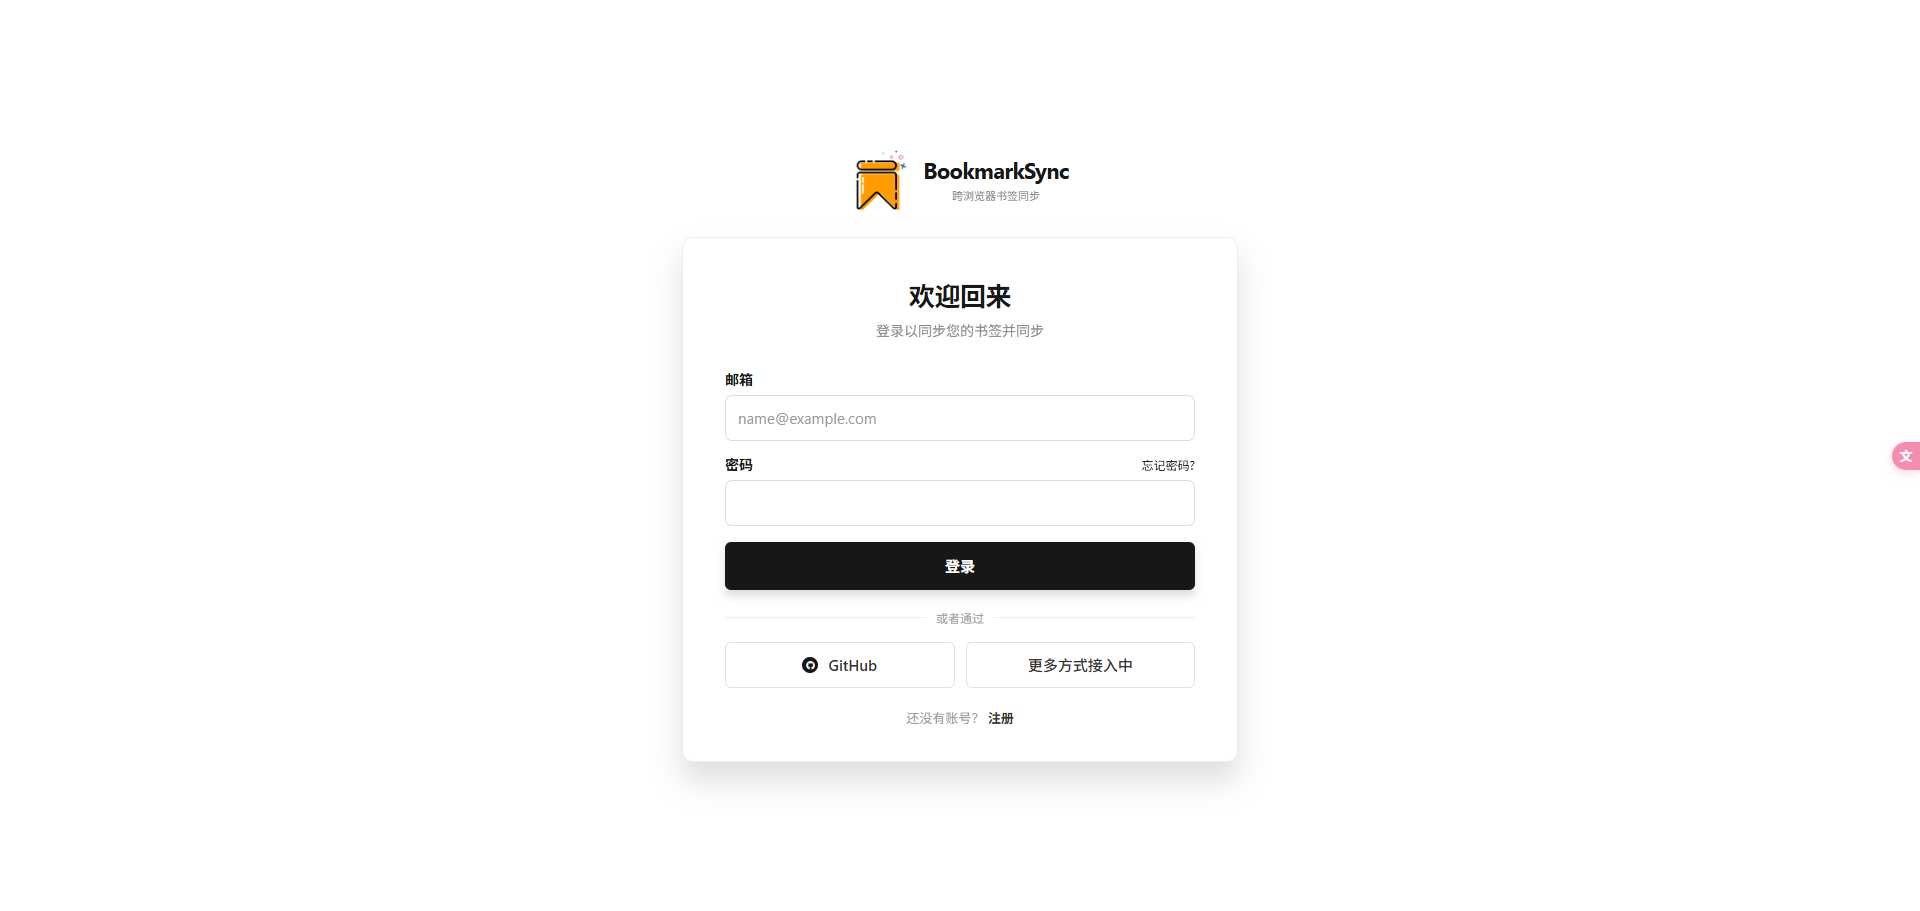
3. Enter Login Page
Click the "Login" button in the upper right corner:
4. Complete Login
- Enter email and password, or select GitHub login
- After successful login, the extension will automatically start syncing bookmarks
Configure Extension
After login, you can adjust extension settings as needed.
Access Settings Page
- Open the extension
- Click the "Settings" button in the lower left corner
Common Settings
Bookmark Sync Settings:
- Auto Sync: Automatically sync bookmarks in the background when enabled
- Sync Frequency: Set the time interval for auto sync (e.g., every 30 minutes)
- Manual Sync: Can manually trigger sync at any time
Interface Settings:
- Language: Select interface display language (Chinese/English, etc.)
- Theme: Choose light or dark theme
Privacy Settings:
- Private Bookmark Password: Set or modify private bookmark access password
- Auto Lock: Set how long of inactivity before automatically exiting private bookmarks
⚠️ Important Note: Settings are saved locally only and will not sync across devices. If you use BookmarkSync on multiple computers, you need to configure these settings on each device separately.
First Sync
After completing login, the extension will perform first sync:
- Upload Local Bookmarks: Upload existing browser bookmarks to the cloud
- Download Cloud Bookmarks: If you've used the extension on other devices before, it will download cloud bookmarks
- Merge Bookmarks: If both sides have bookmarks, the system will intelligently merge to avoid duplicates
First sync may take a few minutes depending on the number of bookmarks.
Sync Status Description
- ✅ Sync Complete: Bookmarks successfully synced
- 🔄 Syncing: Uploading or downloading data
- ⚠️ Conflict: Data conflict detected, manual selection required
- ❌ Sync Failed: Network error or other issues caused sync interruption
Verify Installation
After installation and configuration, verify the extension is working properly:
- ✅ BookmarkSync icon appears in toolbar
- ✅ Clicking icon opens extension interface normally
- ✅ Upper right corner shows logged-in status (displays username or avatar)
- ✅ Browser bookmarks have synced to the cloud
- ✅ Can open cloud bookmarks and private bookmarks features
Common Installation Issues
Q: "Invalid package" error during manual installation
A: Ensure the downloaded extension file is complete and browser version meets requirements. If it's a .crx file, try extracting and loading as a folder.
Q: Can't find extension icon after installation
A: Click the puzzle icon (extension management) in the toolbar, find BookmarkSync in the list and click the pin to fix it.
Q: "Network error" when logging in
A: Check network connection and ensure internet access. If using proxy or VPN, try disabling and retry.
Q: GitHub login fails
A: Ensure your GitHub account has a bound email and has authorized BookmarkSync to access your email information.
Q: Bookmarks duplicated after first sync
A: The system will try to avoid duplicates, but if it detects the same bookmarks, manually clean them in settings.
Next Steps
- Check Getting Started to learn basic usage
- Check Cloud Bookmarks Documentation to learn how to use cloud bookmarks
- Check Private Bookmarks Documentation to learn how to use private bookmarks